DIY Christmas Ornaments With the SliceElite
Homemade Christmas gifts just got a lot easier with the SliceElite from Making Memories! I spent last week making ten different ornaments, some to keep and some to give away. Basically, they were variations of either an embellished or shaped pillow. Let me walk you through the basics.
For both types of ornaments, follow steps 1 and 2.
Shaped Pillow Design

1. For this project, you will need Slice Fusible Web and the 'Tis the Season design card (or another Christmas-themed card).

2. Using a hot, dry iron, press the fusible web onto the wrong side of your fabric. Hint: Steam will keep the web from fusing properly.

3. Place your reinforced fabric right side up on your cutting mat and cut two images at the 4-inch size. Switch fabrics and cut 2 sets of the layered design. When you are done, you will have 2 ornaments and 2 sets of embellishments.

4. Remove the paper backing on the stripes and top, and press them into position on your ornament background with your iron. Repeat with the second side.

5. Now peel the backing off of the ornaments themselves. This is the time to insert your tassels and hanging string. Carefully line up the two ornaments, wrong sides together, and briefly press them at the top and bottom ONLY to keep your tassel/string in place. Note: If you accidentally press the ornament together in an undesired location, it can be undone by running a chopstick in between the layers to sever the bond.

- 6. Sew around the perimeter of the ornament, being sure to catch the tassel and hanging string in your stitching. I used a zigzag stitch, but if my machine had a blanket stitch, I would have used that. Leave an opening of about 1 1/2 inches where you can put in the stuffing. Once your ornament is stuffed, come back to the machine and stitch it up completely.

Embellished Pillow Design
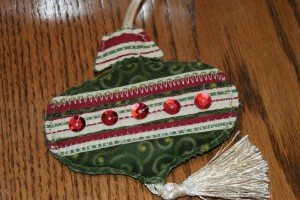
7. Now choose your own method of embellishment. We chose to zig zag along the stripes, flattening it out a bit. Then we added 5 sequins along the center stripe to complete the look.
emilypattee
Latest posts by emilypattee (see all)
- DIY Christmas Ornaments With the SliceElite - December 13, 2010
- PlayDoh Cake Makin’ Station - November 13, 2010
- Fun Playdate Activities for Girls - October 16, 2010

